Create, validate and convert Certificates
Certificate:
A certificate is a public key with extra properties (like company name, country,…) that is signed by some Certificate authority that guarantees that the attached properties are true.
View
Even though PEM encoded certificates are ASCII they are not human readable. Here are some commands that will let you output the contents of a certificate in human readable form.
View PEM encoded certificate
Use the command that has the extension of your certificate replacing cert.xxx with the name of your certificate
openssl x509 -in cert.pem -text -noout
openssl x509 -in cert.cer -text -noout
openssl x509 -in cert.crt -text -noout
If you get the following error it means that you are trying to view a DER encoded certificate and need to use the commands in the “View DER encoded certificate” section below:
unable to load certificate
12626:error:0906D06C:PEM routines:PEM_read_bio:no start line:pem_lib.c:647:Expecting: TRUSTED CERTIFICATE View DER encoded Certificate
View DER encoded certificate
openssl x509 -in certificate.der -inform der -text -noout
If you get the following error it means that you are trying to view a PEM encoded certificate with a command meant for DER encoded certs. Use a command in the “View PEM encoded certificate” section above:
unable to load certificate
13978:error:0D0680A8:asn1 encoding routines:ASN1_CHECK_TLEN:wrong tag:tasn_dec.c:1306:
13978:error:0D07803A:asn1 encoding routines:ASN1_ITEM_EX_D2I:nested asn1 error:tasn_dec.c:380:Type=X509
View all certificates in a certificate chain
# subject + issuer
openssl crl2pkcs7 -nocrl -certfile host.domain.tld-ca-chain.pem | openssl pkcs7 -print_certs -noout
# full public keys
openssl crl2pkcs7 -nocrl -certfile host.domain.tld-ca-chain.pem | openssl pkcs7 -print_certs -text -noout
Convert
These commands allow you to convert certificates and keys to different formats to make them compatible with specific types of servers or software.
-
Convert a DER file (.crt .cer .der) to PEM
openssl x509 -inform der -in certificate.cer -out certificate.pem -
Convert a PEM file to DER
openssl x509 -outform der -in certificate.pem -out certificate.der -
Convert a PKCS#12 file (.pfx .p12) containing a private key and certificates to PEM
openssl pkcs12 -in keyStore.pfx -out keyStore.pem -nodes You can add -nocerts to only output the private key or add -nokeys to only output the certificates. -
Convert a PEM certificate file and a private key to PKCS#12 (.pfx .p12)
openssl pkcs12 -export -out certificate.pfx -inkey privateKey.key -in certificate.crt -certfile CACert.crt -
Convert PEM to CRT (.CRT file)
openssl x509 -outform der -in certificate.pem -out certificate.crt
OpenSSL Convert PEM
-
Convert PEM to DER
openssl x509 -outform der -in certificate.pem -out certificate.der -
Convert PEM to P7B
openssl crl2pkcs7 -nocrl -certfile certificate.cer -out certificate.p7b -certfile CACert.cer -
Convert PEM to PFX
openssl pkcs12 -export -out certificate.pfx -inkey privateKey.key -in certificate.crt -certfile CACert.crt
OpenSSL Convert DER
-
Convert DER to PEM
openssl x509 -inform der -in certificate.cer -out certificate.pem
OpenSSL Convert P7B
-
Convert P7B to PEM
openssl pkcs7 -print_certs -in certificate.p7b -out certificate.cer -
Convert P7B to PFX
 openssl pkcs7 -print_certs -in certificate.p7b -out certificate.cer

 openssl pkcs12 -export -in certificate.cer -inkey privateKey.key -out certificate.pfx -certfile CACert.cer
OpenSSL Convert PFX
-
Convert PFX to PEM
openssl pkcs12 -in certificate.pfx -out certificate.cer -nodes
Generate RSA keys by OpenSSL
-
Using OpenSSL on the command line you’d first need to generate a public and private key. You should password protect this file using the -passout argument, there are many different forms that this argument can take so consult the OpenSSL documentation about that.
openssl genrsa -out private.pem 4096 -
This creates a key file called private.pem that uses 4096 bits. This file actually has both the private and public keys, so you should extract the public one from this file:
 openssl rsa -in private.pem -out public.pem -outform PEM -pubout

 or

 openssl rsa -in private.pem -pubout > public.pem

 or

 openssl rsa -in private.pem -pubout -out public.pem
You’ll now have public.pem containing just your public key, you can freely share this with 3rd parties. You can test it all by just encrypting something yourself using your public key and then decrypting using your private key, first we need a bit of data to encrypt:
-
Example file :
echo 'too many secrets' > file.txt -
You now have some data in file.txt, lets encrypt it using OpenSSL and the public key:
openssl rsautl -encrypt -inkey public.pem -pubin -in file.txt -out file.ssl -
This creates an encrypted version of file.txt calling it file.ssl, if you look at this file it’s just binary junk, nothing very useful to anyone. Now you can decrypt it using the private key:
openssl rsautl -decrypt -inkey private.pem -in file.ssl -out decrypted.txt -
You will now have an unencrypted file in decrypted.txt:
 cat decrypted.txt
 |output -> too many secrets
RSA TOOLS Options in OpenSSL
-
NAME
rsa - RSA key processing tool -
SYNOPSIS
openssl rsa [-help] [-inform PEM|NET|DER] [-outform PEM|NET|DER] [-in filename] [-passin arg] [-out filename] [-passout arg] [-aes128] [-aes192] [-aes256] [-camellia128] [-camellia192] [-camellia256] [-des] [-des3] [-idea] [-text] [-noout] [-modulus] [-check] [-pubin] [-pubout] [-RSAPublicKey_in] [-RSAPublicKey_out] [-engine id] -
DESCRIPTION
The rsa command processes RSA keys. They can be converted between various forms and their components printed out. Note this command uses the traditional SSLeay compatible format for private key encryption: newer applications should use the more secure PKCS#8 format using the pkcs8 utility. -
COMMAND OPTIONS
  -help

 > Print out a usage message.

  -inform DER|NET|PEM

 > This specifies the input format. The DER option uses an ASN1 DER encoded form compatible with the PKCS#1 RSAPrivateKey orSubjectPublicKeyInfo format. The PEM form is the default format: it consists of the DER format base64 encoded with additional header andfooter lines. On input PKCS#8 format private keys are also accepted. The NET form is a format is described in the NOTES section.

  -outform DER|NET|PEM

 > This specifies the output format, the options have the same meaning as the -inform option.

  -in filename

 > This specifies the input filename to read a key from or standard input if this option is not specified. If the key is encrypted a passphrase will be prompted for.

  -passin arg

 > the input file password source. For more information about the format of arg see the PASS PHRASE ARGUMENTS section in openssl.

  -out filename

 > This specifies the output filename to write a key to or standard output if this option is not specified. If any encryption options are setthen a pass phrase will be prompted for. The output filename should not be the same as the input filename.

  -passout password

 > the output file password source. For more information about the format of arg see the PASS PHRASE ARGUMENTS section in openssl.

  -aes128|-aes192|-aes256|-camellia128|-camellia192|-camellia256|-des|-des3|-idea

 > These options encrypt the private key with the specified cipher before outputting it. A pass phrase is prompted for. If none of theseoptions is specified the key is written in plain text. This means that using the rsa utility to read in an encrypted key with no encryptionoption can be used to remove the pass phrase from a key, or by setting the encryption options it can be use to add or change the passphrase. These options can only be used with PEM format output files.

  -text

 > prints out the various public or private key components in plain text in addition to the encoded version.

  -noout

 > this option prevents output of the encoded version of the key.

  -modulus

 > this option prints out the value of the modulus of the key.

  -check

 > this option checks the consistency of an RSA private key.

  -pubin

 > by default a private key is read from the input file: with this option a public key is read instead.

  -pubout

 > by default a private key is output: with this option a public key will be output instead. This option is automatically set if the input isa public key.

  -RSAPublicKey_in, -RSAPublicKey_out

 > like -pubin and -pubout except RSAPublicKey format is used instead.

  -engine id

 > specifying an engine (by its unique id string) will cause rsa to attempt to obtain a functional reference to the specified engine, thusinitialising it if needed. The engine will then be set as the default for all available algorithms.
EXAMPLES
To remove the pass phrase on an RSA private key:
openssl rsa -in key.pem -out keyout.pemTo encrypt a private key using triple DES:
openssl rsa -in key.pem -des3 -out keyout.pemTo convert a private key from PEM to DER format:
openssl rsa -in key.pem -outform DER -out keyout.derTo print out the components of a private key to standard output:
openssl rsa -in key.pem -text -nooutTo just output the public part of a private key:
openssl rsa -in key.pem -pubout -out pubkey.pemOutput the public part of a private key in RSAPublicKey format:
openssl rsa -in key.pem -RSAPublicKey_out -out pubkey.pem
Formats
RSA Public Key
-----BEGIN RSA PUBLIC KEY-----
-----END RSA PUBLIC KEY-----
Encrypted PEM Private Key
-----BEGIN RSA PRIVATE KEY-----
Proc-Type: 4,ENCRYPTED
-----END RSA PRIVATE KEY-----
CRL
-----BEGIN X509 CRL-----
-----END X509 CRL-----
CRT
-----BEGIN CERTIFICATE-----
-----END CERTIFICATE-----
CSR
-----BEGIN CERTIFICATE REQUEST-----
-----END CERTIFICATE REQUEST-----
NEW CSR
-----BEGIN NEW CERTIFICATE REQUEST-----
-----END NEW CERTIFICATE REQUEST-----
PEM
-----END RSA PRIVATE KEY-----
-----BEGIN RSA PRIVATE KEY-----
PKCS7
-----BEGIN PKCS7-----
-----END PKCS7-----
PRIVATE KEY
-----BEGIN PRIVATE KEY-----
-----END PRIVATE KEY-----
DSA KEY
-----BEGIN DSA PRIVATE KEY-----
-----END DSA PRIVATE KEY-----
Elliptic Curve
-----BEGIN EC PRIVATE KEY-----
-----BEGIN EC PRIVATE KEY-----
PGP Private Key
-----BEGIN PGP PRIVATE KEY BLOCK-----
-----END PGP PRIVATE KEY BLOCK-----
PGP Public Key
-----BEGIN PGP PUBLIC KEY BLOCK-----
-----END PGP PUBLIC KEY BLOCK-----
For OpenSSL to recognize it as a PEM format, it must be encoded in Base64, with the following header:
-----BEGIN CERTIFICATE-----
and footer :
-----END CERTIFICATE-----
Also, each line must be maximum 79 characters long. Otherwise you will receive the error:
2675996:error:0906D064:PEM routines:PEM_read_bio:bad base64 decode:pem_lib.c:818:
Note: the PEM standard (RFC1421) mandates lines with 64 characters long. A PEM certificate stored as a single line can be converted with the UNIX command-line utility:
fold -w 64
- PKCS#1 RSAPublicKey (PEM header: BEGIN RSA PUBLIC KEY)
- PKCS#8 EncryptedPrivateKeyInfo (PEM header: BEGIN ENCRYPTED PRIVATE KEY)
- PKCS#8 PrivateKeyInfo (PEM header: BEGIN PRIVATE KEY)
- X.509 SubjectPublicKeyInfo (PEM header: BEGIN PUBLIC KEY)
- CSR PEM header : (PEM header:—-BEGIN NEW CERTIFICATE REQUEST—–)
- DSA PrivateKeyInfo (PEM header: (—–BEGIN DSA PRIVATE KEY—-)
Verify
Before establishing a SSL/TLS connection, the client needs to be sure that the received certificate is valid. In order to do it the client verifies not only the authenticity of its public key but also other metadata associated with it (to understand this is important to know the contents of a typical digital certificate):
- The signature verifies. This ensures that the certificate was not altered in any way.
- The certificate has not expired. When the certificate is issued by the CA its granted an expiration date.
- The certificate subject matches the host name. The certificate is issued for an specific server. Thus the certificate subject name needs to match the URL the client is trying to connect.
- It has not been revoked. Sometimes certificates can be revoked by their issuers in any case needed (for example, the associate private key has been exposed hence the certificate becomes invalid).
- It was signed by a trusted CA. To prove the certificate authenticity we need to get the CA certificate and verify its trustiness. Nevertheless in PKI there is a concept of Chain of Trust, so the CA certificate could have been issued by another CAs. Therefore we need to get this another CA’s certificate and validate it. And so on… Ergo, in order to trust a certificate, we need to navigate all the way up to the Root CA. Finally, if we trust in the Root CA it is safe to say that we trust in the whole chain.
Validate chain of trust
Depending on the scenario you either have:
a) your entire CA chain in a single file and the actual webserver or client certificate in another file
Verify it with:
openssl verify -untrusted ca-chain.pem client-cert.pem
Note:
Unfortunately, an “intermediate” cert that is actually a root / self-signed will be treated as a trusted CA. It seems openssl will stop verifying the chain as soon as a root certificate is encountered, which may also be Intermediate.pem if it is self-signed. In that case root.pem is not considered
b) the root and intermediate certificates in separate files and the actual webserver or client certificate in another file
Verify with:
openssl verify -CAfile root.pem -untrusted intermediate-chain.pem client-cert.pem
If you have multiple intermediate CAs (e.g. root.pem -> intermediate1.pem -> intermediate2.pem -> client-cert.pem), concatenate them in a single file and pass it via: -untrusted intermediate-chain.pem or do it with cat:
openssl verify -CAfile root.pem -untrusted <(cat intermediate1.pem intermediate2.pem) client-cert.pem
Practical example
openssl verify -CAfile letsencrypt-root-cert/isrgrootx1.pem.txt -untrusted letsencrypt-intermediate-cert/letsencryptauthorityx3.pem.txt /etc/letsencrypt/live/sitename.tld/cert.pem
/etc/letsencrypt/live/sitename.tld/cert.pem: OK
Expiration date
openssl x509 -enddate -noout -in file.pem
Check local certificate files
Here’s my bash command line to list multiple certificates in order of their expiration, most recently expiring first.
    for pem in /etc/ssl/certs/*.pem; do
       printf '%s: %s\n' \
          "$(date --date="$(openssl x509 -enddate -noout -in "$pem"|cut -d= -f 2)" --iso-8601)" \
          "$pem"
    done | sort
Sample output:
2015-12-16: /etc/ssl/certs/Staat_der_Nederlanden_Root_CA.pem
2016-03-22: /etc/ssl/certs/CA_Disig.pem
2016-08-14: /etc/ssl/certs/EBG_Elektronik_Sertifika_Hizmet_S.pem
Check remote servers
Here’s a bash function which checks all your servers, assuming you’re using DNS round-robin. Note that this requires GNU date and won’t work on Mac OS
function check_certs () {
  if [ -z "$1" ]
  then
    echo "domain name missing"
    exit 1
  fi
  name="$1"
  shift

  now_epoch=$( date +%s )

  dig +noall +answer $name | while read _ _ _ _ ip;
  do
    echo -n "$ip:"
    expiry_date=$( echo | openssl s_client -showcerts -servername $name -connect $ip:443 2>/dev/null | openssl x509 -inform pem -noout -enddate | cut -d "=" -f 2 )
    echo -n " $expiry_date";
    expiry_epoch=$( date -d "$expiry_date" +%s )
    expiry_days="$(( ($expiry_epoch - $now_epoch) / (3600 * 24) ))"
    echo "    $expiry_days days"
  done
}
Output example:
$ check_certs stackoverflow.com
151.101.1.69: Aug 14 12:00:00 2019 GMT    603 days
151.101.65.69: Aug 14 12:00:00 2019 GMT    603 days
151.101.129.69: Aug 14 12:00:00 2019 GMT    603 days
151.101.193.69: Aug 14 12:00:00 2019 GMT    603 days
Check with curl
curl --insecure -v https://www.google.com 2>&1 | awk 'BEGIN { cert=0 } /^\* Server certificate:/ { cert=1 } /^\*/ { if (cert) print }'

* Server certificate:
*  subject: C=US; ST=California; L=Mountain View; O=Google LLC; CN=www.google.com
*  start date: Mar  1 09:46:35 2019 GMT
*  expire date: May 24 09:25:00 2019 GMT
*  issuer: C=US; O=Google Trust Services; CN=Google Internet Authority G3
*  SSL certificate verify ok.
* Using HTTP2, server supports multi-use
* Connection state changed (HTTP/2 confirmed)
* Copying HTTP/2 data in stream buffer to connection buffer after upgrade: len=0
* Using Stream ID: 1 (easy handle 0x7ff5dc803600)
* Connection state changed (MAX_CONCURRENT_STREAMS updated)!
* Connection #0 to host www.google.com left intact
You need to provide the entire certificate chain to curl, since curl no longer ships with any CA certs. Since the cacert option can only use one file, you need to concat the full chain info into 1 file. Get the bundle of root CA certificates from https://curl.haxx.se/ca/cacert.pem.
curl --cacert certRepo -u user:passwd -X GET -H 'Content-Type: application/json' "https//somesecureserver.com/rest/field"
Check with openssl s_client
With SNI
If the remote server is using SNI (that is, sharing multiple SSL hosts on a single IP address) you will need to send the correct hostname in order to get the right certificate (-servername option is to enable SNI support).
openssl s_client -showcerts -servername www.example.com -connect www.example.com:443 </dev/null
Without SNI
If the remote server is not using SNI, then you can skip -servername parameter:
openssl s_client -showcerts -connect www.example.com:443 </dev/null
To view the full details of a site’s cert you can use this chain of commands as well:
$ echo | \
    openssl s_client -servername www.example.com -connect www.example.com:443 2>/dev/null | \
    openssl x509 -text
For SMTP with starttls use:
openssl s_client -connect server:port -starttls smtp
For Client Auth protected resources use:
openssl s_client -connect host:port -key our_private_key.pem -showcerts \
    -cert our_server-signed_cert.pem
-prexit will return the data as well:
openssl s_client -connect host:port -prexit
Verify TLS cert with private key
Hopefully you’re never in a situation where you don’t know what private key you used to generate your TLS certificate, but if you do… here’s how you can check.
Note: this is better than uploading the certs to production to check on them 😉
Assuming we have generated a private key named example.com.key and a certificate named example.com.crt we can use openssl to check that the MD5 hashes are the same:
openssl x509 -noout -modulus -in example.com.crt | openssl md5
openssl rsa -noout -modulus -in example.com.key | openssl md5
To make things better, you can write a script:
#!/bin/bash
CERT_MD5=$(openssl x509 -noout -modulus -in example.com.crt | openssl md5)
 KEY_MD5=$(openssl rsa  -noout -modulus -in example.com.key | openssl md5)

if [ "$CERT_MD5" == "$KEY_MD5" ]; then
  echo "Private key matches certificate"
else
  echo "Private key does not match certificate"
fi
Java Key store
keytool -importcert -file certificate.cer -keystore keystore.jks -alias "Alias"
 ..\..\bin\keytool -import -trustcacerts -keystore cacerts -storepass changeit -noprompt -alias yourAliasName -file path\to\certificate.cer
keytool -import -alias joe -file mycert.cer -keystore mycerts -storepass changeit
Create
Create a development certificate with certstrap
brew install certstrap
certstrap init --common-name "ExampleDevCA" --expires "10 years" -o "My Tech Inc." -c "DE" -l "Muenchen" --st "Bayern" --stdout
certstrap request-cert --common-name "example.localhost" -o "My Tech Inc." -c "DE" -l "Muenchen" --st "Bayern" --stdout --domain "*.example.localhost","example.localhost","localhost"
certstrap sign "example.localhost" --CA ExampleDevCA
Create a development certificate with mkcert
brew install mkcert
mkcert "*.example.localhost"

# Clean up with:
rm -vrf "$HOME/Library/Application Support/mkcert"  _wildcard.example*
Create a self-signed certificate with OpenSSL
The commands below and the configuration file create a self-signed certificate (it also shows you how to create a signing request).
Note: The Common Name (CN) is deprecated - the hostname will be matched against available names in the Subject Alternate Name (SAN) field. So enter the main hostname as CN and list it together with the rest of your DNS records in the SAN field.
The DNS names are placed in the SAN through the configuration file with the line subjectAltName = @alternate_names (there’s no way to do it through the command line). Then there’s an alternate_names section in the configuration file (you should tune this to suit your taste):
[ alternate_names ]

DNS.1       = example.com
DNS.2       = www.example.com
DNS.3       = mail.example.com
DNS.4       = ftp.example.com

# Add these if you need them. But usually you don't want them or
#   need them in production. You may need them for development.
# DNS.5       = localhost
# DNS.6       = localhost.localdomain
# DNS.7       = 127.0.0.1

# IPv6 localhost
# DNS.8     = ::1
It’s important to put DNS name in the SAN and not the CN, because both the IETF and the CA/Browser Forums specify the practice. They also specify that DNS names in the CN are deprecated (but not prohibited). If you put a DNS name in the CN, then it must be included in the SAN under the CA/B policies. So you can’t avoid using the Subject Alternate Name.
If you don’t do put DNS names in the SAN, then the certificate will fail to validate under a browser and other user agents which follow the CA/Browser Forum guidelines.
Related: browsers follow the CA/Browser Forum policies; and not the IETF policies. That’s one of the reasons a certificate created with OpenSSL (which generally follows the IETF) sometimes does not validate under a browser (browsers follow the CA/B). They are different standards, they have different issuing policies and different validation requirements.
Create a self signed certificate
Notice the addition of -x509 option:
openssl req -config example-com.conf -new -x509 -sha256 -newkey rsa:2048 -nodes \
    -keyout example-com.key.pem -days 365 -out example-com.cert.pem
Create a signing request
Notice the lack of -x509 option:
openssl req -config example-com.conf -new -sha256 -newkey rsa:2048 -nodes \
    -keyout example-com.key.pem -days 365 -out example-com.req.pem
Print a self-signed certificate
openssl x509 -in example-com.cert.pem -text -noout
Print a signing request
openssl req -in example-com.req.pem -text -noout
Configuration file
Passed via -config option:
[ req ]
default_bits        = 2048
default_keyfile     = server-key.pem
distinguished_name  = subject
req_extensions      = req_ext
x509_extensions     = x509_ext
string_mask         = utf8only

# The Subject DN can be formed using X501 or RFC 4514 (see RFC 4519 for a description).
#   Its sort of a mashup. For example, RFC 4514 does not provide emailAddress.
[ subject ]
countryName         = Country Name (2 letter code)
countryName_default     = US

stateOrProvinceName     = State or Province Name (full name)
stateOrProvinceName_default = NY

localityName            = Locality Name (eg, city)
localityName_default        = New York

organizationName         = Organization Name (eg, company)
organizationName_default    = Example, LLC

# Use a friendly name here because it's presented to the user. The server's DNS
#   names are placed in Subject Alternate Names. Plus, DNS names here is deprecated
#   by both IETF and CA/Browser Forums. If you place a DNS name here, then you
#   must include the DNS name in the SAN too (otherwise, Chrome and others that
#   strictly follow the CA/Browser Baseline Requirements will fail).
commonName          = Common Name (e.g. server FQDN or YOUR name)
commonName_default      = Example Company

emailAddress            = Email Address
emailAddress_default        = test@example.com

# Section x509_ext is used when generating a self-signed certificate. I.e., openssl req -x509 ...
[ x509_ext ]

subjectKeyIdentifier        = hash
authorityKeyIdentifier    = keyid,issuer

# You only need digitalSignature below. *If* you don't allow
#   RSA Key transport (i.e., you use ephemeral cipher suites), then
#   omit keyEncipherment because that's key transport.
basicConstraints        = CA:FALSE
keyUsage            = digitalSignature, keyEncipherment
subjectAltName          = @alternate_names
nsComment           = "OpenSSL Generated Certificate"

# RFC 5280, Section 4.2.1.12 makes EKU optional
#   CA/Browser Baseline Requirements, Appendix (B)(3)(G) makes me confused
#   In either case, you probably only need serverAuth.
# extendedKeyUsage    = serverAuth, clientAuth

# Section req_ext is used when generating a certificate signing request. I.e., openssl req ...
[ req_ext ]

subjectKeyIdentifier        = hash

basicConstraints        = CA:FALSE
keyUsage            = digitalSignature, keyEncipherment
subjectAltName          = @alternate_names
nsComment           = "OpenSSL Generated Certificate"

# RFC 5280, Section 4.2.1.12 makes EKU optional
#   CA/Browser Baseline Requirements, Appendix (B)(3)(G) makes me confused
#   In either case, you probably only need serverAuth.
# extendedKeyUsage    = serverAuth, clientAuth

[ alternate_names ]

DNS.1       = example.com
DNS.2       = www.example.com
DNS.3       = mail.example.com
DNS.4       = ftp.example.com

# Add these if you need them. But usually you don't want them or
#   need them in production. You may need them for development.
# DNS.5       = localhost
# DNS.6       = localhost.localdomain
# DNS.7       = 127.0.0.1

# IPv6 localhost
# DNS.8     = ::1
Current certificate best practices
- Set lifetime lower than 398 days
- Use SHA-256 instead of SHA-1
- Use 2048 bit keys for now (4096 is still too resource intensive)
Certificate chain order
The correct order of a certificate bundle a.k.a certificate chain e.g:
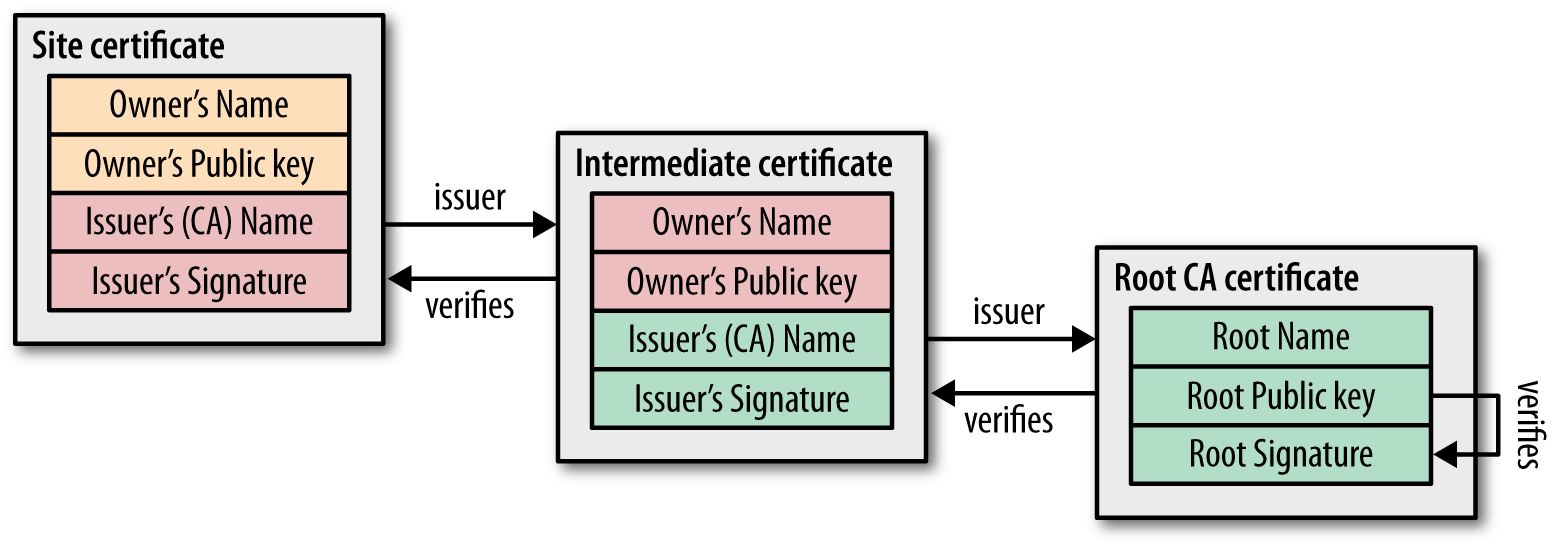
is:
Web Server:
1 - your certificate
2 - intermediate n
3 - intermediate 2
4 - intermediate 1
HTTP Client:
5 - root
The following certificate chain issues can occur:
Missing intermediate certificates: When a site does not provide the necessary intermediate certificates, a trust path cannot be established. Generally speaking, one cannot distinguish that case from a certificate signed by a custom CA. However, some server certificates include the information on which intermediate certificates are required, and also where to obtain them. If the intermediate certificates are found, then it’s very likely that a trust path will be established. In such cases you should reconfigure the server to add the missing certificates.Certificate chains that are too long: Sites often include more certificates in the handshake than necessary. Of those, most include one extra certificate, and that is the actual trusted root certificate (which browsers already have in their storage). This last certificate is not needed for the validation process. Having an additional certificate in the chain wastes bandwidth and decreases overall performance slightly. A small number of sites will include a very large number of certificates as a result of misconfiguration. Such sites will typically suffer significant performance issues and need to be reconfigured.Certificates given in incorrect order: According to the standard, certificates must be presented in the order in which they are needed. The main, server, certificate must come first, followed by the certificate that signed it, followed by the next certificate in the chain, and so on. A small number of sites does not get this order right. Most SSL clients will deal with this problem silently, but there is a small number of platforms that will give up.
Streamlined CSR creation
To create web server certificates a CSR is required. Since many projects have their own CSR signing process, the following template can be used:
req.conf
[req]
distinguished_name = req_distinguished_name
req_extensions = v3_req
prompt = no

[req_distinguished_name]
C = DE
ST = Bayern
L = Muenchen
O = Example Corp
OU = CASE/BI
CN = *.example.com

[v3_req]
keyUsage = keyEncipherment, dataEncipherment
extendedKeyUsage = serverAuth
subjectAltName = @alt_names

[alt_names]
DNS.1 = example.com
DNS.2 = *.example.com
- Customize the DN and the following lines:
# replace with your domain (wildcard or specific hostname)
CN = *.example.com

# increment the number suffix for each additional domain entry
[alt_names]
DNS.1 = example.com
DNS.2 = *.example.com
- Then generate the CSR and corresponding key:
FILENAME=example.com
openssl req -new -out ${FILENAME}.csr -newkey rsa:2048 -nodes -sha256 -keyout ${FILENAME}.key -config req.conf
- If you already have a key and only need to renew a certificate, use the following command instead:
FILENAME=example.com
openssl req -new -out ${FILENAME}.csr -sha256 -key ${FILENAME}.key -config req.conf
The generated CSR can be checked as follows:
openssl req -in ${FILENAME}.csr -noout -text
The CSR can now be submitted for signing.
The private key remains in your possession. Note that the same private key will be used even if you’ve renewed a certificate. This is import for certificate pinning because it ensures that the certificate signature remains the same.
Bonus: fire and forget
Use the following script to skip having to remember the commands. Hardcode the keyname. The CSR will have the same base name.
renew.sh
#!/bin/bash

FILENAME="example.com"
KEY="${FILENAME}.key"
CSR="${FILENAME}.csr"

# create CSR
openssl req -new -out "${CSR}" -sha256 -key "${KEY}" -config req.conf

# print CSR contents
openssl req -in "${CSR}" -noout -text
Notes
You can also add -nodes (short for no DES) if you don’t want to protect your private key with a passphrase. Otherwise it will prompt you for “at least a 4 character” password.
Sources:
- https://github.com/ssllabs/research/wiki/SSL-and-TLS-Deployment-Best-Practices#21-use-complete-certificate-chains
- https://support.ssl.com/index.php?/Knowledgebase/Article/View/19
- https://8gwifi.org/PemParserFunctions.jsp
- https://gist.github.com/mtigas/952344
- https://stackoverflow.com/questions/25625572/how-to-create-pfx-file-containing-only-one-of-private-public-key
- https://jamielinux.com/docs/openssl-certificate-authority/sign-server-and-client-certificates.html
- https://github.com/dwyl/learn-environment-variables/issues/17
- https://stackoverflow.com/questions/21297139/how-do-you-sign-a-certificate-signing-request-with-your-certification-authority/21340898
- https://stackoverflow.com/questions/49457787/how-to-export-a-multi-line-environment-variable-in-bash-terminal-e-g-rsa-privat/54675024#54675024